Introduction to Ghost Cookies
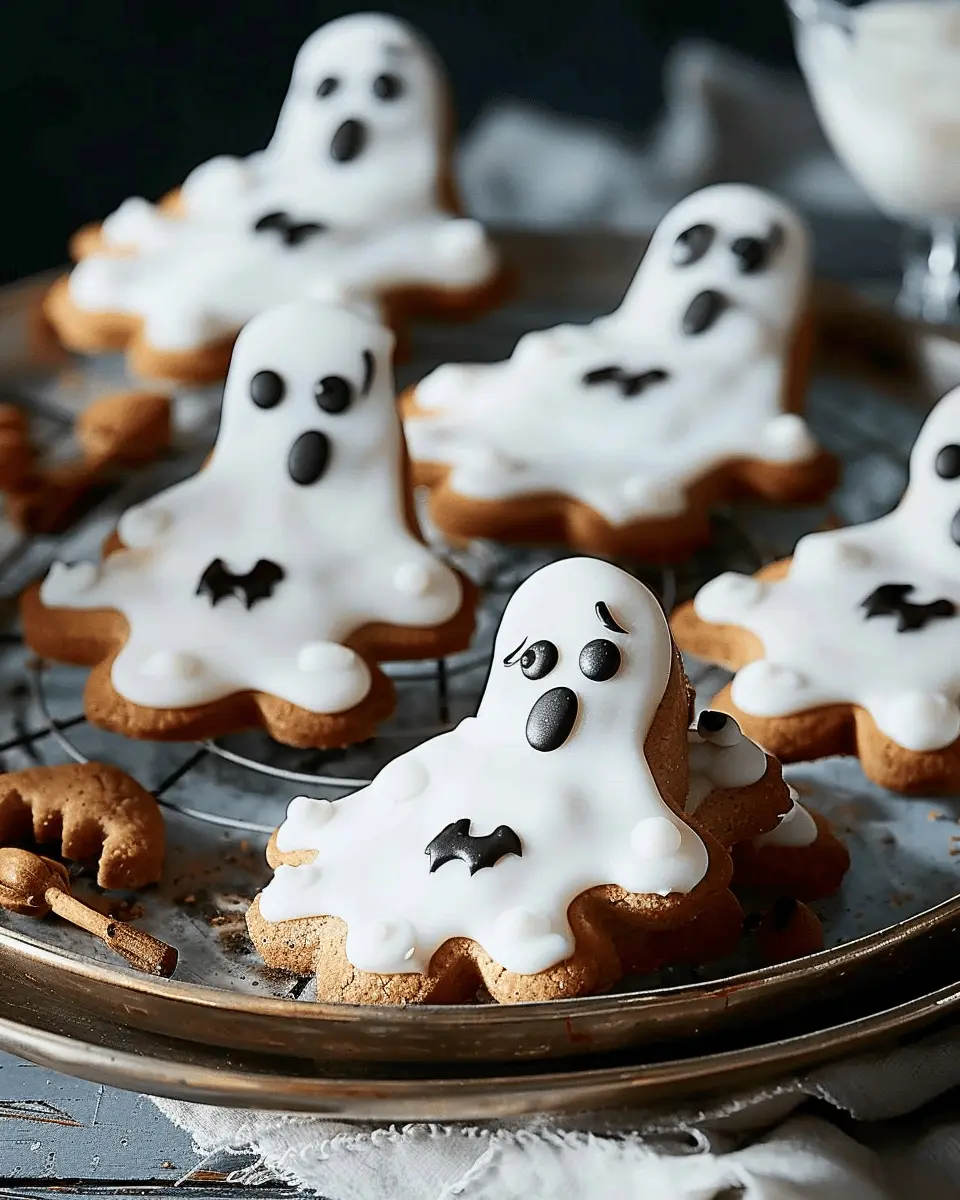
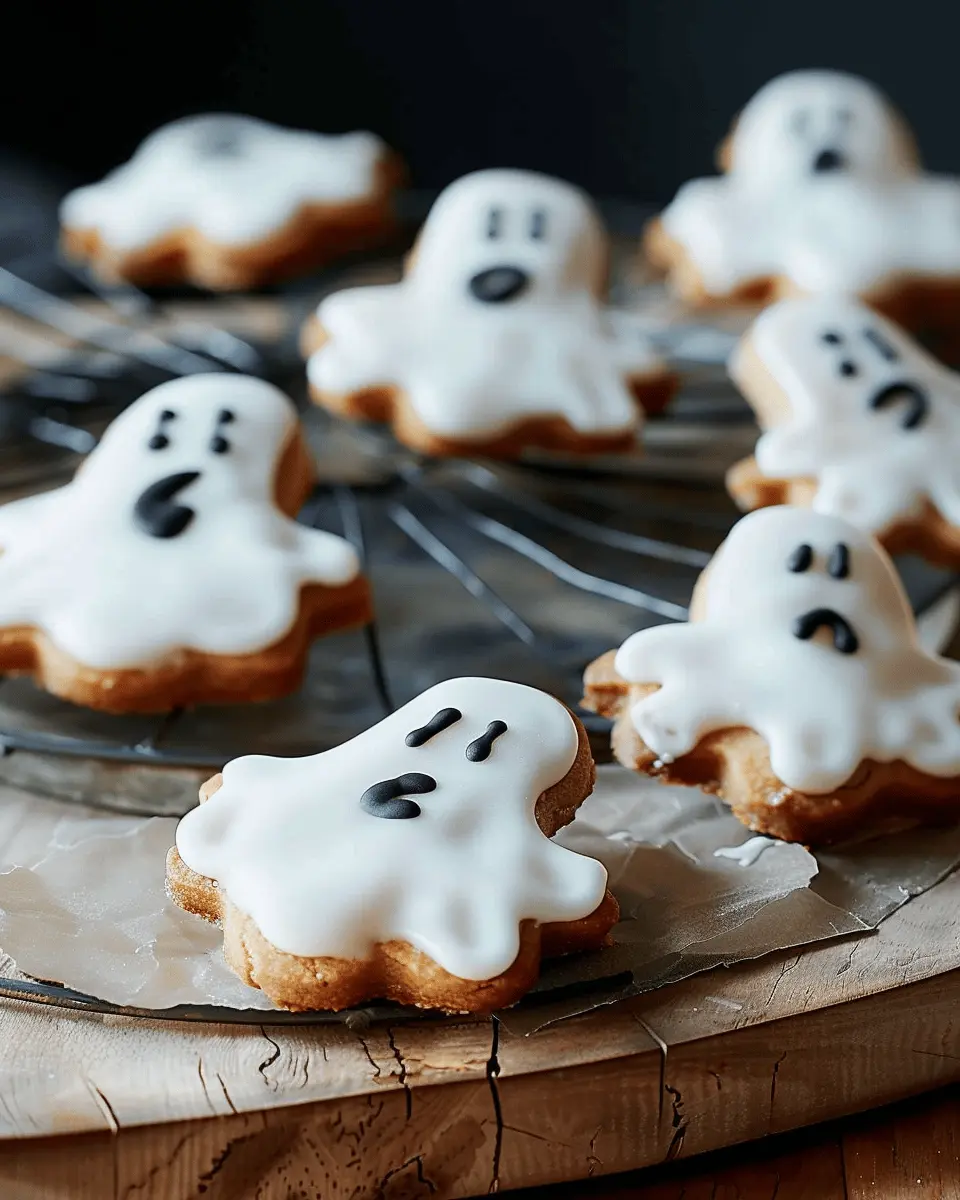
When Halloween rolls around, we all start looking for fun and spooky ways to celebrate, and what better way than with delightful ghost cookies? These whimsical treats are not just a feast for the taste buds; they’re also a visual delight! Imagine a platter filled with adorable, ghost-shaped cookies, each one frosted in white icing with charming little eyes. It’s the kind of eye candy that makes your Halloween party that much more festive.
Why Ghost Cookies Are Perfect for Halloween
Ghost cookies provide an exciting way to engage with the spirit of Halloween. They combine creativity and deliciousness, making them a hit for both kids and adults alike. Think about it: when you walk into a party and see a table adorned with these eerie (yet adorable) treats, it sets the perfect tone for the evening! Plus, they give you the chance to explore your baking skills—with just a little practice, you can master the art of cookie decorating.
This spooky season, consider making memories with your friends or family while baking these delightful ghost cookies. Whether it’s a pre-Halloween gathering or a last-minute trick-or-treat prepping session, these cookies offer a fantastic way to bond over a shared activity. In fact, studies show that family culinary experiences can improve the quality of relationships and have lasting positive effects on individuals (see more on this at Psychology Today).
Want to wow your guests? Here are a few reasons why ghost cookies should be on your baking list this Halloween:
- Customizable Designs: You have endless creative possibilities with decorating—let your imagination run wild!
- Social Media Worthy: Capture that perfect Instagram shot of your ghost cookie creation!
- Delicious Flavor: From classic sugar cookies to pumpkin spice variations, they’re sure to please any palate.
So gear up, get those baking supplies ready, and prepare to make some enchanting ghost cookies that’ll leave everyone asking for seconds! If you’re curious about other Halloween treats, be sure to check out our full recipe section.
Ingredients for Ghost Cookies
Essential ingredients for Halloween fun
To whip up a batch of delightful ghost cookies, you’ll need some key ingredients that bring the spooky spirit to life. Here’s what you’ll need:
- Sugar: The base for sweetness; it really makes those ghosts pop!
- Butter: Adds a rich flavor and creates a wonderfully soft texture.
- Flour: All-purpose flour is perfect for stability and structure.
- Eggs: These bind everything together and provide a fluffy inside.
- Baking powder: This is essential for that lovely rise.
- Vanilla extract: A splash adds depth to the flavor.
- White chocolate chips: These are for melting into a gooey ghostly coating.
Optional ingredients for customization
Why not make your ghost cookies even more exciting? Here are some optional add-ins to consider:
- Chocolate chips: For some added richness and a fun contrast.
- Food coloring: Create colored ghosts for a playful twist!
- Sprinkles or edible glitter: Add a festive touch to your spooky treats.
Feel free to get creative with the flavors and textures! By customizing your cookies, you can make them uniquely yours, impressing friends at any Halloween gathering.
If you’re curious about different baking techniques or need a refresher on mixing methods, check out resources like King Arthur Baking. Happy baking!
Preparing Ghost Cookies
Making ghost cookies is a fun and engaging way to celebrate the spooky season, whether you’re hosting a Halloween party or just looking to enjoy a sweet treat. With a bit of preparation and creativity, your ghost cookies are bound to become a hit. Let’s walk through the steps together!
Gather Your Ingredients
Before diving into the baking, it’s essential to gather all your ingredients. Here’s what you’ll need for these adorable ghost cookies:
-
Cookies:
-
2 cups all-purpose flour
-
1 cup unsalted butter, softened
-
1 cup granulated sugar
-
1 large egg
-
1 teaspoon vanilla extract
-
1 teaspoon baking powder
-
A pinch of salt
-
Icing:
-
2 cups powdered sugar
-
2 tablespoons meringue powder
-
4 tablespoons water (or as needed for consistency)
-
Decoration:
-
Mini marshmallows (for the ghostly heads)
-
Black icing (for eyes and mouth)
Be sure to have everything on hand, so you won’t find yourself scrambling for a missing ingredient halfway through!
Preparing the Icing
With all your ingredients lined up, it’s time to whip up the icing! This step is crucial, as the right consistency will make decorating so much easier and more enjoyable. Here’s how to do it:
- In a mixing bowl, combine the powdered sugar and meringue powder.
- Slowly add water, one tablespoon at a time, and mix until the icing reaches a smooth, pouring consistency. You can also use an electric mixer for a fluffier texture.
- Once combined, divide the icing into two bowls: keep one white for the ghost bodies and color the other black for the facial features.
Having the right icing will not only make your ghost cookies look adorable but also delicious! For more detailed icing tips, check out this article on royal icing techniques.
Assembling the Ghost Cookies
Now that your cookies are baked and your icing is ready, it’s time to bring your ghost cookies to life! Here’s a straightforward approach:
- Cool the cookies: Ensure your cookies are completely cool before icing them—this prevents the icing from melting and running off.
- Spread the white icing: Use a spatula or the back of a spoon to cover each cooled cookie with the white icing generously. This will give them a ghostly appearance.
Think of assembling the cookies as bringing your spooky vision to life. The anticipation builds as you prepare the finishing touches!
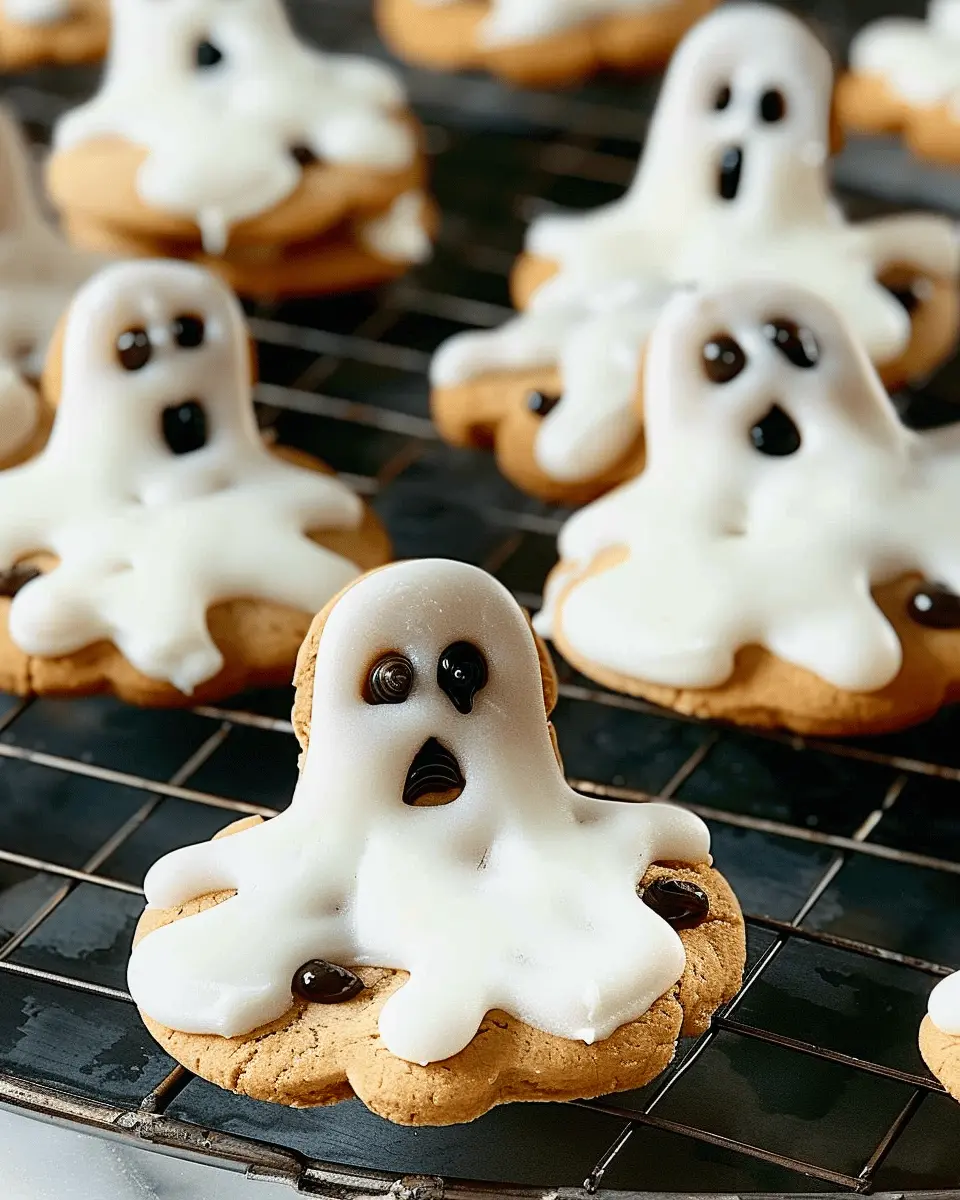
Icing the Marshmallows
Next, let’s add those marshmallow heads:
- Take your mini marshmallows and dip them into the white icing or use a small spoon to coat them.
- Once covered, place them on top of the iced cookies before the icing sets so they stick well.
Marshmallows are not just great for decorating; they’ll add a fluffy texture that’s sure to enhance the experience. If you’re feeling adventurous, consider swapping marshmallows for other sweet toppings like gummy candies!
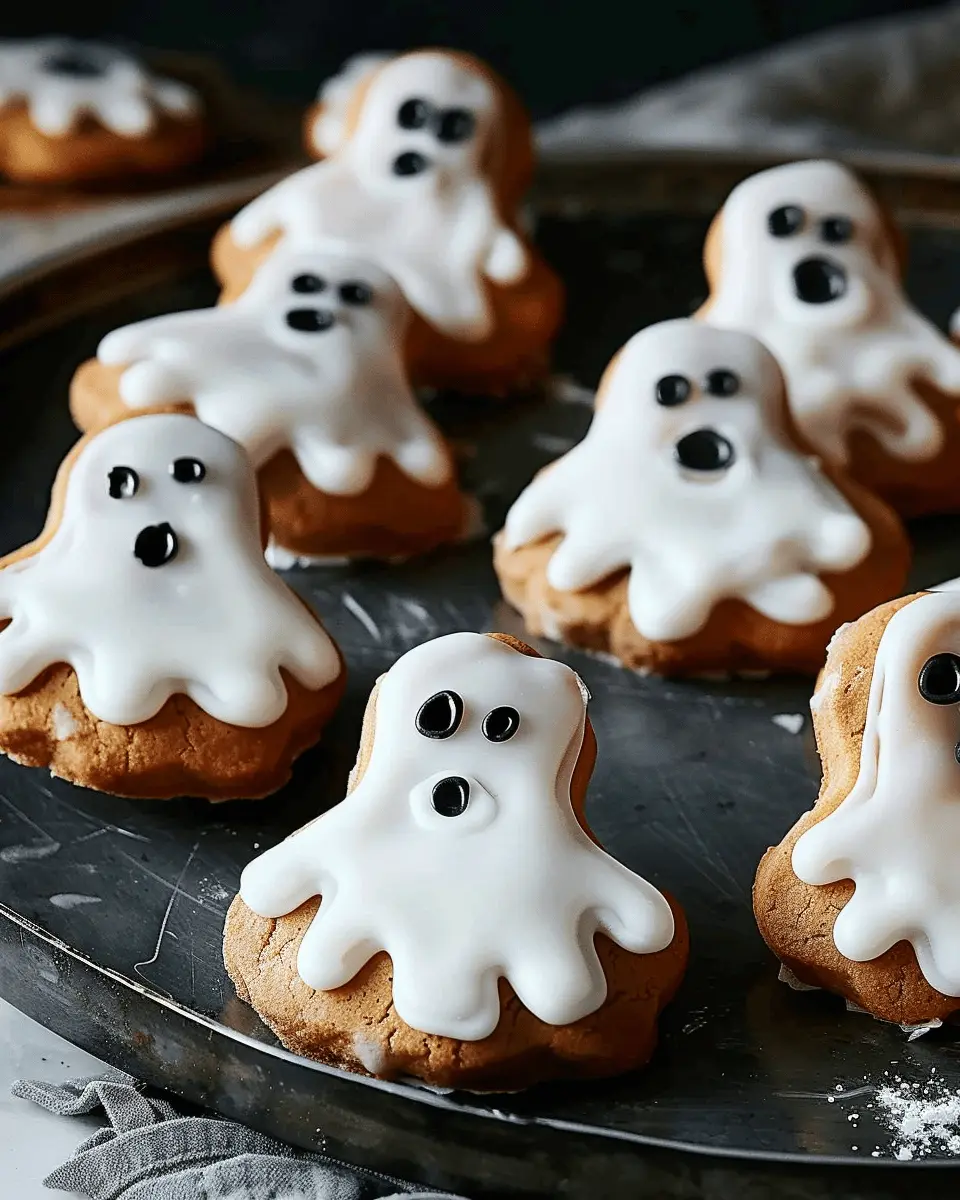
Decorating with Black Icing
Now comes the fun part—giving your ghost cookies their charming expressions! Here’s how to use the black icing effectively:
- Using a piping bag or a simple ziplock bag (with the corner snipped off), carefully pipe small eyes and mouth shapes onto the marshmallows.
- Be playful with your designs! Some ghosts can have spooky eyes, while others might look more friendly.
Remember, the goal is to have fun. They don’t have to be perfect; their charm is in the creativity! Moreover, experimenting with different designs can lead to some truly unique ghost cookies that will impress your friends.
And there you have it—your ghost cookies are ready to haunt your dessert table! Share your creation on social media, or enjoy them with friends as you revel in the spirit of Halloween. Happy baking!
Variations on Ghost Cookies
When it comes to baking ghost cookies, the possibilities are as diverse as your imagination. Here are two delightful variations that cater to different tastes and dietary needs.
Chocolate Ghost Cookies
For those with a sweet tooth, chocolate ghost cookies are a decadent twist on the classic recipe. By simply adding cocoa powder to the dough, you can create a rich, chocolatey version that will impress any guest. Here’s how to make them:
- Ingredients Addition: Incorporate 1/3 cup of unsweetened cocoa powder into your dry mix.
- Chocolate Chips: Toss in some semi-sweet or dark chocolate chips for that extra gooey texture.
Not only does this version satisfy chocolate cravings, but it also pairs wonderfully with a warm cup of cocoa or coffee, making it perfect for your next gathering.
Check out this guide on baking with chocolate for some expert tips!
Gluten-Free Ghost Cookies
Are you catering to a gluten-free crowd? No worries! You can easily make ghost cookies without gluten by using a blend of gluten-free flour. Here’s a simple adaptation:
- Flour Substitution: Replace regular flour with a gluten-free all-purpose blend in equal parts.
- Binding: Ensure to add a bit of xanthan gum (about 1/4 teaspoon) to help bind the ingredients, especially if your blend doesn’t already contain it.
These gluten-free ghost cookies are just as delicious as their traditional counterparts, allowing everyone to enjoy a festive treat. Did you know that the global gluten-free market is projected to reach USD 32.5 billion by 2028? This shows just how many of us are seeking out delicious, inclusive options for our diets!
Feel free to experiment with different add-ins like nuts or dried fruits. Happy baking!
Cooking Tips and Notes for Ghost Cookies
Best Practices for Icing Consistency
Creating perfect ghost cookies isn’t just about the cookie itself; the icing is key to achieving that festive look. You want your icing to be the right consistency—think of it as toothpaste: thick enough to keep its shape but thin enough to spread smoothly. A simple way to check is the “ribbon test.” Drizzle icing from a spoon; if it holds its shape for a few seconds before disappearing, you’re golden. If it’s too thick, add a few drops of water. Too thin? A little more powdered sugar will do the trick!
Storage Tips for Freshness
To keep your ghost cookies fresh and delicious, store them in an airtight container at room temperature. This helps maintain their chewy texture and delightful flavor. If you’re making them in advance, you can freeze them! Just layer parchment paper between each cookie to prevent sticking. When you’re ready to enjoy, let them thaw at room temperature. For more tips on cookie storage, check out resources like The Cookie Chronicles, which offer advice on keeping your baked treats fresher for longer!
With these handy tips and tricks, you’ll ensure that your spooky treats not only look fantastic but taste amazing too!
Serving Suggestions for Ghost Cookies
Ideal occasions for ghost cookies
Ghost cookies are fun and versatile treats that are perfect for a variety of occasions. Whether you’re hosting a spooky-themed Halloween party, a cozy fall gathering, or even a kid’s birthday bash, these delightful cookies can steal the spotlight. Imagine the smiles on your guests’ faces as they bite into these playful confections! They also make fantastic gifts or care packages for friends and loved ones who appreciate a thoughtful surprise.
Pairing ideas with drinks and snacks
When it comes to serving ghost cookies, the right pairings can elevate the entire experience. Consider offering them alongside:
- Hot apple cider: The warm spices will complement the sweetness of the cookies beautifully.
- Pumpkin spice lattes: This classic fall drink pairs perfectly, making for a seasonal treat.
- Milk alternatives: Unsweetened almond or oat milk can cater to various dietary needs while pairing well with the cookies.
Enhancing your setups with creative, themed serving platters can further add to the ambience. For more ideas on enhancing your gatherings, check out this entertaining guide!
With these suggestions, your ghost cookie experience will surely be a hit!
Time Breakdown for Ghost Cookies
Preparation time
Making these delicious ghost cookies is a quick task that typically takes around 15 minutes. This includes gathering all your ingredients, mixing them together, and shaping the cookies to look like adorable little ghosts. Trust me; it’s a fun part of the process, especially if you’re making them with friends or family.
Setting time
Once your ghost cookies are shaped and ready to go, they need about 30 minutes to set. This allows the icing to harden, transforming them into spooky treats that are perfect for any Halloween gathering.
Total time
In total, you’re looking at about 45 minutes from start to finish for these delightful ghost cookies. Perfect for a last-minute treat! If you want to add extra flair, consider checking out some decorating tips and ideas here.
Nutritional Facts for Ghost Cookies
When indulging in these delightful ghost cookies, it’s good to know what you’re treating yourself to. Here’s a quick look at their nutritional value!
Calories per serving
Each serving of these spooky delights contains about 150 calories. Perfect for satisfying your sweet tooth without derailing your day!
Macronutrient breakdown
These ghost cookies are a fun twist on a classic treat. Here’s how they stack up:
- Carbohydrates: 20g
- Protein: 2g
- Fat: 7g
The balance of these macronutrients helps you enjoy the cookies while still being mindful of your diet. Pro tip: Pairing them with a glass of plant-based milk can enhance your nutrients!
For more on maintaining a balanced diet, check out resources from the Harvard T.H. Chan School of Public Health. And don’t forget to savor the joy of baking; it’s as healthy for the mind as it is for the body!
FAQs about Ghost Cookies
Can I make ghost cookies in advance?
Absolutely! Ghost cookies are perfect for prepping ahead of time, making your life a bit easier during busy seasons like Halloween. You can bake the cookies a day or two in advance and let them cool completely. Once cooled, store them in an airtight container, and they’ll retain their deliciousness. Many home bakers suggest icing them the day you plan to serve them for that fresh, crisp finish.
How do I store leftover ghost cookies?
If you find yourself with leftover ghost cookies (which can be rare because they’re so delicious), you’ll want to store them properly to keep that delightful softness. There are a couple of effective methods — you can keep them in an airtight container at room temperature for about 3 to 5 days. For longer storage, consider freezing them. Just place the cookies in a freezer-safe container, with parchment paper between layers to prevent sticking. They can last up to three months frozen. When you’re ready to enjoy them, simply thaw them at room temperature.
Can I substitute ingredients in the recipe?
Of course! Substituting ingredients is one of the joys of baking, and ghost cookies are no exception. If you’re out of regular flour, for instance, using a gluten-free blend can work well. Want to make them richer? Swap regular chocolate chips for dark chocolate chips. For a lighter twist, you can use almond flour instead of all-purpose flour. Just remember, certain substitutions might alter the texture slightly, but experimentation often leads to delightful surprises. Check out reputable sources like King Arthur Baking for more tips on ingredient swaps.
Whether you’re a seasoned baker or a novice, these FAQs can help you navigate your ghost cookie creation with ease. Happy baking!
Conclusion on Ghost Cookies
Why you should try making ghost cookies this Halloween
Making ghost cookies is not just about baking; it’s about creating a festive experience that brings friends and family together. These delightful treats can set the mood for Halloween, sparking joy as you decorate and share them. Plus, they make for a fun project, whether you’re a newbie in the kitchen or a seasoned baker.
Encouragement to share your cookie creations
Once you’ve mastered your ghost cookies, don’t keep them to yourself! Share your spooky treats on social media or with loved ones. It’s always exciting to see how each person adds their unique flair. Join communities like Pinterest or Instagram to showcase your creativity and inspire others. You never know—your delicious cookies might turn into the next big trend this Halloween! Enjoy your baking adventure!
PrintGhost cookies: The Best Festive Treat for Every Occasion
Ghost cookies are a delightful treat that embodies the spirit of celebration, perfect for Halloween and other festive gatherings.
- Prep Time: 15 minutes
- Cook Time: 12 minutes
- Total Time: 27 minutes
- Yield: 24 cookies 1x
- Category: Desserts
- Method: Baking
- Cuisine: American
- Diet: Vegetarian
Ingredients
- 2 cups all-purpose flour
- 1 cup powdered sugar
- 1/2 cup unsalted butter
- 1 egg
- 1 teaspoon vanilla extract
- 1/2 teaspoon baking powder
- 1/4 teaspoon salt
- 1 cup white chocolate chips
- 1/2 cup black icing
Instructions
- Preheat your oven to 350°F (175°C).
- In a bowl, cream together the butter and powdered sugar.
- Beat in the egg and vanilla extract until well blended.
- In another bowl, whisk together the flour, baking powder, and salt.
- Gradually add the dry ingredients to the wet mixture and mix until combined.
- Fold in the white chocolate chips.
- Drop spoonfuls of dough onto a baking sheet lined with parchment paper.
- Bake for 10-12 minutes until lightly golden.
- Allow to cool, then decorate with black icing to create ghost faces.
Notes
- These cookies can be decorated in various ways for different occasions.
- Consider using colorful icing for non-Halloween festivities.
Nutrition
- Serving Size: 2 cookies
- Calories: 150
- Sugar: 10g
- Sodium: 50mg
- Fat: 8g
- Saturated Fat: 5g
- Unsaturated Fat: 3g
- Trans Fat: 0g
- Carbohydrates: 20g
- Fiber: 1g
- Protein: 2g
- Cholesterol: 15mg
Keywords: Ghost cookies, festive treats, Halloween cookies