Introduction to Layered Espresso Martini Mousse
What is Layered Espresso Martini Mousse?
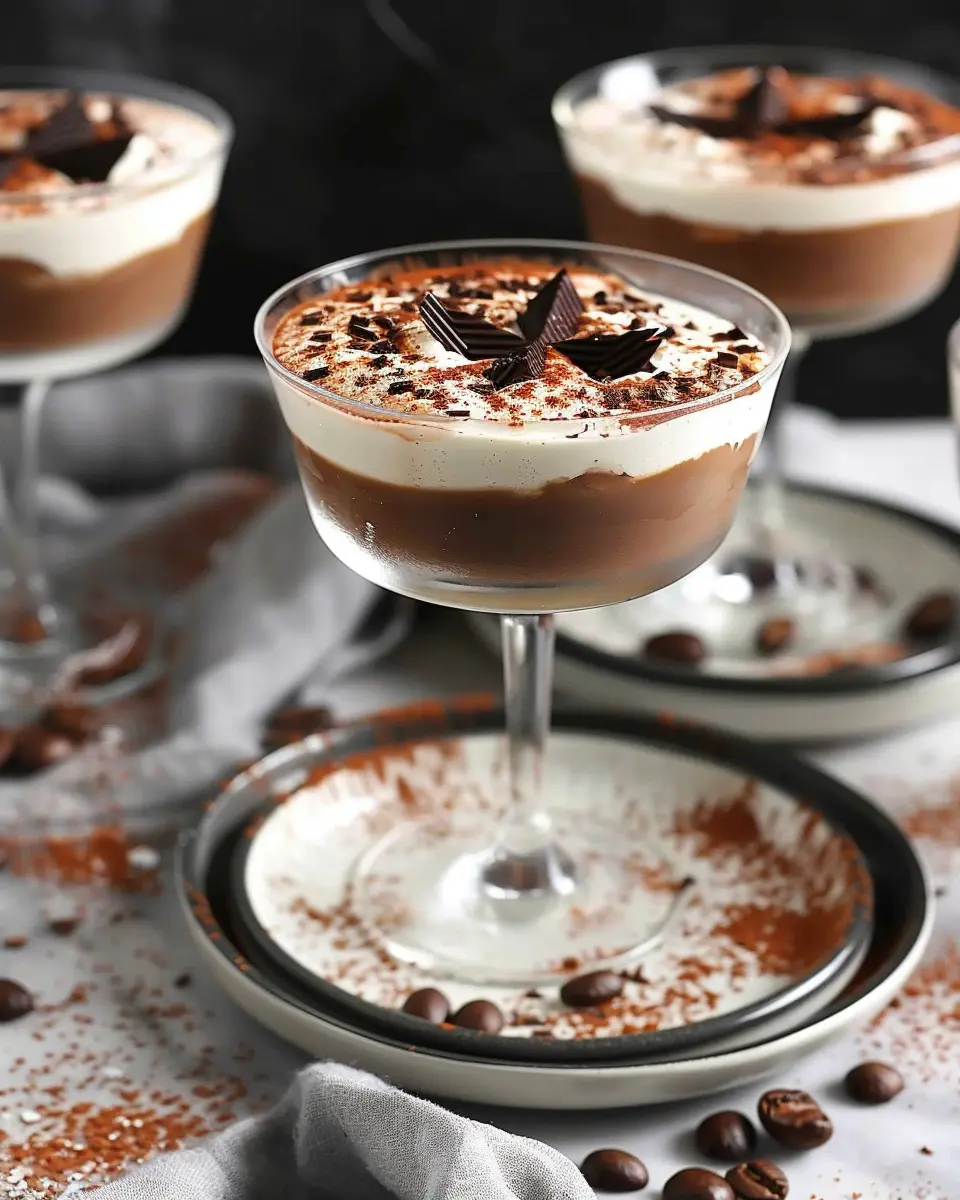
Layered espresso martini mousse is a sumptuous dessert that marries the rich flavors of coffee, chocolate, and a hint of creamy indulgence into a delightful experience for your taste buds. Picture this: silky layers of espresso-infused mousse gently nestled between light, airy whipped cream, all topped with a dusting of cocoa powder. It’s the perfect treat after a long day, or even as a showstopper at your next dinner party. Each bite offers a blend of textures and flavors that dance on your palate, making it a memorable dessert for both friends and family.
The Inspiration Behind This Delightful Dessert
You might be wondering, what inspired this delicious creation? The espresso martini, a beloved coffee-flavored cocktail, has been a staple in trendy bars for years. The combination of coffee and sweetness has garnered fans around the globe, making it the ultimate pick-me-up. When you think about it, transforming this iconic drink into a dessert seemed like the perfect way to bring its rich flavors to a different dining experience.
In my quest to create something unique and delectable, I wanted to capture the essence of an espresso martini without the fuss of alcohol. After experimenting with various ingredients—experimenting with layers for added texture—I finally landed on this layered espresso martini mousse. The end result is a playful take on the classic cocktail that speaks to all the coffee lovers out there.
So, whether you’re hosting a dinner or just craving something special, this dessert is sure to impress. And the best part? It’s relatively easy to whip up, allowing you more time to catch up with friends and savor every moment. If you’d like to learn more about the history of coffee or explore different dessert recipes inspired by cocktails, check out specialty coffee associations or popular dessert blogs.
Now that you have a taste of what’s to come, let’s dive into the recipe and create a layered espresso martini mousse that will leave your guests craving more!

Ingredients for Layered Espresso Martini Mousse
Creating a stunning layered espresso martini mousse is easier than you think. Let’s break down the ingredients you’ll need for each delicious layer of this delightful dessert.
Espresso Martini Jelly Layer Ingredients
- 1 cup brewed espresso (cooled)
- 2 tablespoons sugar (adjust for sweetness)
- 1 tablespoon gelatin powder
- 1/4 cup water
To give your mousse that essential espresso flavor, quality espresso is a must. You can also check out this guide on how to brew the perfect espresso for tips!
Espresso Chocolate Mousse Layer Ingredients
- 1 cup dark chocolate (chopped)
- 1 cup heavy cream (divided)
- 2 large egg whites
- 2 tablespoons sugar
- 1 tablespoon espresso powder
This layer marries chocolate and espresso, creating a rich, velvety texture that complements the jelly layer beautifully.
Whipped Cream and Toppings Ingredients
- 1 cup heavy whipping cream
- 2 tablespoons powdered sugar
- Cocoa powder or chocolate shavings (for garnish)
- Coffee beans (optional, for decorative flair)
Don’t forget; the whipped cream is what ties everything together, adding that light, airy finish to your layered espresso martini mousse. Get ready to impress your guests with layers of flavor and texture!
Preparing Layered Espresso Martini Mousse
If you’re ready to indulge in a dessert that balances rich flavors and a delightful texture, you’re in for a treat! This layered espresso martini mousse is not just a visual delight but also a taste sensation that’s perfect for impressing friends or treating yourself after a long week. Let’s break down the preparation process into straightforward steps, so you can whip up this fantastic dessert with ease.
Prepare the espresso martini jelly layer
The first step in creating your layered espresso martini mousse is to prepare the jelly layer. This layer adds a refreshing contrast to the creamy mousse.
- Ingredients you need:
- 1 cup strong brewed espresso (cooled)
- 1 cup coffee alternative (like chicory)
- 2 tbsp sugar (adjust based on your sweetness preference)
- 2 tsp gelatin (or agar-agar as a vegetarian alternative)
-
Mix: Start by combining the brewed espresso, coffee alternative, and sugar in a saucepan. Heat gently until the sugar dissolves, ensuring you do not bring it to a boil.
-
Add gelatin: In a small bowl, dissolve the gelatin in a couple of tablespoons of cold water. Once it blooms, stir it into the warm espresso mixture.
-
Cool: Allow the mixture to cool to room temperature, then pour it into serving glasses to set in the fridge. This layer needs to chill for about 1-2 hours, so you have ample time to move on to the next step while it’s setting!
Make the espresso chocolate mousse layer
Next up is the rich and velvety espresso chocolate mousse. This layer is where the real indulgence happens.
- Ingredients required:
- 1 cup dark chocolate (around 70% cocoa)
- 2 eggs, separated
- 2 tbsp espresso (follow the same brewing process)
- 1/2 cup heavy cream
- Pinch of salt
-
Melt the chocolate: Using a double boiler or a microwave, melt the dark chocolate and allow it to cool slightly.
-
Whip egg whites: In a mixing bowl, whip the egg whites with a pinch of salt until stiff peaks form. This adds some delightful airiness to your mousse.
-
Combine: Whisk the egg yolks into the cooled chocolate, followed by the espresso. Gently fold in the whipped egg whites, being careful not to deflate them.
-
Gently fold: Finally, fold in the heavy cream until well combined. This adds a smooth texture that balances the density of the chocolate.
Create the whipped cream topping
The final touch is a light and airy whipped cream that will crown your mousse to perfection.
- Ingredients:
- 1 cup heavy cream
- 2 tbsp powdered sugar
- 1 tsp vanilla extract
- Whip: Using a hand mixer or a stand mixer, whip the heavy cream until soft peaks form. Gradually add the powdered sugar and vanilla, continuing to whip until stiff peaks form.
Assemble the layers in glasses
Now comes the fun part—layering! This is where you really get to be creative with your layered espresso martini mousse.
-
Start with the jelly: Take your glasses with the chilled espresso jelly and add a layer of the espresso chocolate mousse on top. Be generous—you want that rich flavor to shine through!
-
Repeat: Add another layer of jelly followed by more mousse until you reach the rim of the glass.
-
Finish with whipped cream: Top it all off with a lovely dollop of your homemade whipped cream.
Chill and set before serving
Once you have layered your dessert, it’s crucial to let it chill again. This allows all the flavors to meld together beautifully.
- Final chill: Cover the glasses with plastic wrap and place them in the fridge for at least 1 hour (or longer if you can resist!).
When ready to serve, consider garnishing with cocoa powder, espresso beans, or a sprinkle of chocolate shavings for that extra touch. Your decadent layered espresso martini mousse will not only look stunning but will also thrill the taste buds of anyone lucky enough to taste it! Enjoy every creamy, dreamy bite!

Variations on Layered Espresso Martini Mousse
Creating your version of layered espresso martini mousse can be a delightful journey in the kitchen. Here are some fun variations that cater to different preferences!
Non-alcoholic Options
For those wanting to savor the luxurious flavors of an espresso martini without the kick, simply swap out the coffee liqueur for a rich coffee syrup. Combine espresso with a bit of vanilla extract and a dash of chocolate syrup for depth. You can also experiment with coffee-flavored sparkling waters to give it that bubbly sensory experience.
Vegan Alternatives
If you’re following a plant-based diet, making a vegan layered espresso martini mousse is totally achievable! Use aquafaba (the liquid from a can of chickpeas) as a substitute for egg whites. This will provide an airy texture similar to whipped eggs. For the creamy element, opt for coconut cream or silken tofu blended until smooth. Not only is this a fantastic vegan option, but it’s also packed with flavor!
Flavor Variations to Try
Feeling adventurous? Here are a few flavor twists that can elevate your mousse to new heights:
- Hazelnut: Add hazelnut extract or incorporate crushed hazelnuts for a nutty kick.
- Irish Cream: A splash of non-alcoholic Irish cream syrup can give your mousse an indulgent richness.
- Mint: Introducing mint extract or even crushed mint leaves can provide a refreshing layer.
Each twist offers a unique taste, so don’t hesitate to get creative! Whether you stick with the classic or mix things up, your layered espresso martini mousse will surely impress your friends and provide a delightful dessert experience. For more inspiration, check out sites like BBC Good Food or Bon Appétit for additional ideas.
Cooking Tips for Layered Espresso Martini Mousse
Best practices for gelatin preparation
When making your layered espresso martini mousse, the gelatin needs special attention. Always start with powdered gelatin, sprinkling it over cold water and allowing it to bloom for about 5 minutes. This process ensures your mousse sets perfectly without any lumps. If you’re working with sheets of gelatin, soak them in cold water until pliable, squeezing out excess liquid before adding to your warm mixtures. It’s crucial to integrate the gelatin gently into your chocolate or espresso blend—temper it to avoid clumping by adding a little warm mixture into the bloomed gelatin, stirring until smooth, and then combining it all back together.
Tips for making smooth chocolate mousse
Creating a silky chocolate mousse is both an art and a science. First, melt high-quality chocolate over low heat—this prevents burning and ensures a rich flavor. Whip your heavy cream to soft peaks to incorporate air, resulting in a light texture. Gradually fold the chocolate into the cream, being gentle to retain that airy quality. For an extra touch, consider passing the mousse through a fine mesh sieve before layering; this step eliminates any tiny lumps, making your layered espresso martini mousse flawlessly smooth. Want to dive deeper? Check out this guide on chocolate textures for expert insights!

Serving Suggestions for Layered Espresso Martini Mousse
Presentation Ideas for Special Occasions
When it comes to serving your layered espresso martini mousse, presentation is everything. Consider elegant dessert glasses like coupe or stemless wine glasses for a chic look. Layer the mousse in these vessels to showcase those stunning espresso and cream layers! Garnish with a sprinkle of cocoa powder or chocolate shavings for an added touch of sophistication. If you’re feeling adventurous, a few coffee beans on top can elevate the experience, making it both beautiful and delicious.
Pairing Suggestions with Coffee and Dessert
To enhance your layered espresso martini mousse, you might want to think about pairing it with a rich, robust coffee, such as a freshly brewed dark roast or even a cold brew. The bold flavors complement the cocoa perfectly. You could also serve it alongside mini pastries or chocolate-dipped treats for a delightful coffee-inspired dessert platter. Don’t forget to explore options like non-dairy whipped cream or homemade chocolate sauce to cater to all guest preferences!
For more dessert inspiration, check out this guide on how to pair coffee with dessert. Create an unforgettable experience that your guests will talk about long after the last spoonful!
Time Breakdown for Layered Espresso Martini Mousse
Preparation time
Getting started on your layered espresso martini mousse takes about 30 minutes. This includes whipping up your espresso-infused mousse and layering it in your serving dishes. Remember to take your time—your mousse deserves some love!
Chilling time
Patience is key here! Once you’ve assembled everything, let those delightful layers chill for at least 2 hours. This step is vital for allowing the flavors to meld and for achieving that perfect mousse texture.
Total time
All in all, your total commitment for this tasty treat will be around 2 hours and 30 minutes. With just a little planning, you’ll have an impressive dessert that’s sure to wow your guests or treat yourself after a long week. Why not check out more inspiring dessert recipes at Epicurious?
Nutritional Facts for Layered Espresso Martini Mousse
Calories per serving
Let’s kick things off with the basics. This layered espresso martini mousse packs approximately 300 calories per serving. Not too shabby for a delightful dessert, right? This can definitely satisfy your sweet tooth without completely derailing your diet!
Breakdown of key nutrients
Now, let’s dive a little deeper into what makes this dessert not just delicious but also somewhat nutritious.
- Protein: Around 6g per serving, largely thanks to the eggs and dairy used.
- Fats: About 18g, primarily from the whipped cream, which gives it that silky texture.
- Carbohydrates: Roughly 25g, sourced from sugar and any optional additions like chocolate or coffee.
This layered espresso martini mousse is a treat that combines indulgence with reasonable nutritional values, making it a thoughtful choice for gatherings or a relaxing evening at home. If you’re keen on finding a balance between pleasure and health, consider substituting high-fat ingredients with lighter alternatives to keep those calories in check.
For more insightful nutritional information, you might find the USDA’s food database helpful for breakdowns on specific ingredients. Checking online platforms, such as Healthline, can further illuminate which substitutes can keep this dessert delightful yet healthy.
FAQs about Layered Espresso Martini Mousse
Can I make this dessert ahead of time?
Absolutely! Layered espresso martini mousse is perfect for making ahead. You can whip it up a day in advance and store it in the refrigerator, allowing the flavors to deepen. Just assemble the layers in your serving dishes and cover them well. This not only saves you time on the day of serving, but it also enhances the texture, making it even more delightful!
What can I substitute for the mousse ingredients?
If you’re looking to customize your layered espresso martini mousse, there are several great alternatives:
- For Espresso: Use brewed coffee for a milder flavor.
- For Mascarpone: Cream cheese or a soft tofu alternative can work well if you’re aiming for a lighter or dairy-free version.
- For Sugar: Consider using honey, maple syrup, or a sugar substitute to accommodate dietary preferences.
- For Heavy Cream: A non-dairy whipped cream made from coconut cream can add a tasty twist.
These substitutions keep the essence of the dessert while letting you make it your own. Enthusiasts often share their versions on platforms like Food52 and Serious Eats!
How do I store leftovers?
Storing leftovers of layered espresso martini mousse is simple! Just keep it covered in the refrigerator. It’s best enjoyed within 2-3 days for optimal taste and texture. If you’ve arranged it in individual servings, just put plastic wrap or a lid over each dish. Avoid freezing the mousse, as it can change texture when thawed.
Remember, enjoying the dessert fresh is part of the experience, so gather your friends and relish in a delightful evening together!
Conclusion on Layered Espresso Martini Mousse
Why this dessert is a must-try
The layered espresso martini mousse isn’t just a dessert; it’s a delightful experience that brings together rich flavors and velvety textures. Imagine a creamy delight that perfectly balances the boldness of espresso with a hint of sweetness. This dessert is perfect for dinner parties or a cozy night in when you want to indulge a bit.
Why not elevate your next celebration with this decadent treat? Packed with satisfying layers and whipped magic, it’s sure to impress your guests or bring a smile to your face after a long day. Discover more dessert inspiration and tips at websites like Serious Eats and Food Network. You might just find your next favorite recipe!
PrintLayered Espresso Martini Mousse: The Indulgent Dessert Delight

A rich and indulgent dessert that combines the flavors of a classic espresso martini with the creamy texture of mousse.
- Prep Time: 20 minutes
- Cook Time: 0 minutes
- Total Time: 2 hours 20 minutes
- Yield: 4 servings 1x
- Category: Dessert
- Method: Chilled
- Cuisine: Italian
- Diet: Vegetarian
Ingredients
- 2 cups heavy cream
- 1 cup espresso, cooled
- 1 cup mascarpone cheese
- 3/4 cup sugar
- 1/4 cup coffee liqueur
- 1 teaspoon vanilla extract
- 1 pinch salt
- Chocolate shavings, for garnish
Instructions
- In a large bowl, whip the heavy cream until stiff peaks form.
- In a separate bowl, combine the mascarpone cheese, sugar, coffee liqueur, vanilla extract, and salt. Mix until smooth.
- Gently fold the whipped cream into the mascarpone mixture until well combined.
- Layer the mousse in serving glasses, alternating with layers of cooled espresso.
- Chill in the refrigerator for at least 2 hours before serving.
- Garnish with chocolate shavings before enjoying.
Notes
- For an extra coffee kick, consider using strong brewed coffee instead of espresso.
- Can be made a day in advance for convenience.
Nutrition
- Serving Size: 1 glass
- Calories: 450
- Sugar: 30g
- Sodium: 80mg
- Fat: 30g
- Saturated Fat: 18g
- Unsaturated Fat: 8g
- Trans Fat: 0g
- Carbohydrates: 35g
- Fiber: 1g
- Protein: 6g
- Cholesterol: 85mg
Keywords: Layered Espresso Martini Mousse, dessert, mousse, espresso, coffee liqueur